Arduino and SCCharts
Program Arduino with SCCharts
- Program Arduino with SCCharts
Overview
Arduino is a project and community wich creates open-source software and open-source hardware. The Arduino boards and software are well suited for novices and expierenced programmers alike to create digital devices. In the following we will see how to develop applications for the Arduino boards using SCCharts together with the Arduino Eclipse Plugin. Therefore we will first download and setup the development environment and afterwards create and upload a small example project.
If you want to learn the SCCharts langugage first, you can follow these links:
Download and Configure KIELER
Download and unpack the nightly build of KIELER for your OS. It is available at the Downloads page.
Note: Java 1.8 is needed on all operating systems. With Java 1.7 not all plugins of KIELER will be loaded.
The Arduino Eclipse Plugin
There is an Eclipse plugin for Arduino, which makes it easy to create and deploy projects and to use the IDE features of the C/C++ Development Tools (CDT) when programming Arduino.
You have to install the plugin manually via Help > Install new Software... . Use the following update site: http://eclipse.baeyens.it/update/V4/nightly
The installation might take a few minutes because it will install the Arduino Tools as well as required software such as the CDT. Furthermore it will download the newest version of the Arduino software and libraries.
Creating an Example Project
The following shows how to create a project, which will turn an LED on and off repeatedly.
Create a new project:
- Choose File > New > Project > KIELER SCCharts > SCCharts Project
- In the project creation wizard that opens, select Arduino as environment and hit finish
- The project wizard from the Arduino Eclipse Plugin opens. Set the project name to Blinky and click next.
- Set the configuration for your Arduino board. In the field Upload Protocol select Default.
These settings can be changed later in the project preferences (Right click on project > Preferences > Arduino) - Click finish.
- The project is created and the model file is opened in an editor (This might take a few seconds).
Edit the model:
Change the contents of the model file to the following code and save it.
@Wrapper Clock, 500
input bool clock;
@Wrapper DigitalWrite, 13
output bool light;
initial state lightOff
--> lightOn with clock / light = true;
state lightOn
--> lightOff with clock / light = false;
}
This model will start in the state lightOff. If the variable clock is true, it will switch its state, going from off to on and from on to off. Thereby it sets the light variable so that the led will blink.
The annotations on the input and output variable are used to define which wrapper code is used to set / read them. @Wrapper Clock, "500" will set the input variable to true for one tick every 500ms. @Wrapper DigitalWrite, "13" will set pin 13 to HIGH if the variable is true and to LOW if it is false. We assume that an LED is connected to the Arduino board on pin 13.
The available wrapper code snippets are defined in the assets directory of the project in ftl files (FreeMarker template files). In the default configuration of a new SCCharts project for Arduino, the file main.ftl is processed to create the entry point of the program. Thus it includes other templates containing the available code snippets. The table below gives an overview of the available wrapper code snippets.
Note: To view ftl files with highlighting, you may want to install the FreeMarker IDE feature from the JBoss Tools. However, this is not necessary to work with KIELER. JBoss Tools is available in the Eclipse Market Place and via update site. The update site for stable releases is http://download.jboss.org/jbosstools/neon/stable/updates/ . Note that only the FreeMarker IDE feature is required (Abridged JBoss Tools > FreeMarker IDE).
Build the project:
After the modeling is done, the project can be built. Select Project > Build Project. This will create a new folder kieler-gen with the compiled model file. Further the wrapper code for the model is processed. After the build finished sucessfully, the ino file for the project has been updated with the new wrapper code for the model, and thus the project can be deployed to the Arduino board. The Eclipse Arduino Plugin provides an upload button for this task in the toolbar.
Excluding the simulation folder from the CDT build
A simulation of models is created as part of a build inside kieler-gen/sim/bin. The files inside the sim folder are compiled separately and should not be compiled using the CDT. Otherwise errors will occur, for example because every simulation has its own main function and the CDT expects only one for the project.
Thus the folder kieler-gen/sim has to be excluded from the CDT build. Therefore select the folder and do Right Click > Resource Configurations > Exclude From Build.
Simulating the model
To use the simulation inside the folder kieler-gen/sim/bin, first change to the Simulation Perspective, which provides new buttons in the toolbar. The executables in the bin folder can then be launched via Right Click > KIELER Simulation. The output of a running simulation can be seen in the Data Pool View.
Available Wrapper Code Snippets
There are several wrapper code snippets that can be used as annotations on input and output variables in the model file. These snippets are inserted in the main file template as part of the project launch. The available snippets are listed below.
Snippet Name and Parameters | Description | Use on | Variable type | Remark | Defined in File |
|---|---|---|---|---|---|
Clock, milliseconds | Sets a variable to true if the time in milliseconds passed. | input | bool | See also ResetClock. | timing.ftl |
ResetClock, clockVariableName, autoFalse | Resets a clock, such that the full time intervall of the clock has to elapse, before the clock will be set to true again. If autoFalse is true, the reset variable will be set to false automatically. | output | bool | autoFalse is true per default. | timing.ftl |
Time | Reads the elapsed time since program start in milliseconds. | input | unsigned | timing.ftl | |
TickDuration, targetInMilliseconds | Delays the execution until the tick loop takes at least as long as the given target duration. The input variable is set to the actual tick loop duration. | input | unsigned | Should be used on the very first input variable in the model, so that waiting is the last action in the tick loop. | timing.ftl |
Delay | Lets the program delay the time in milliseconds of the variable value. | output | unsigned | timing.ftl | |
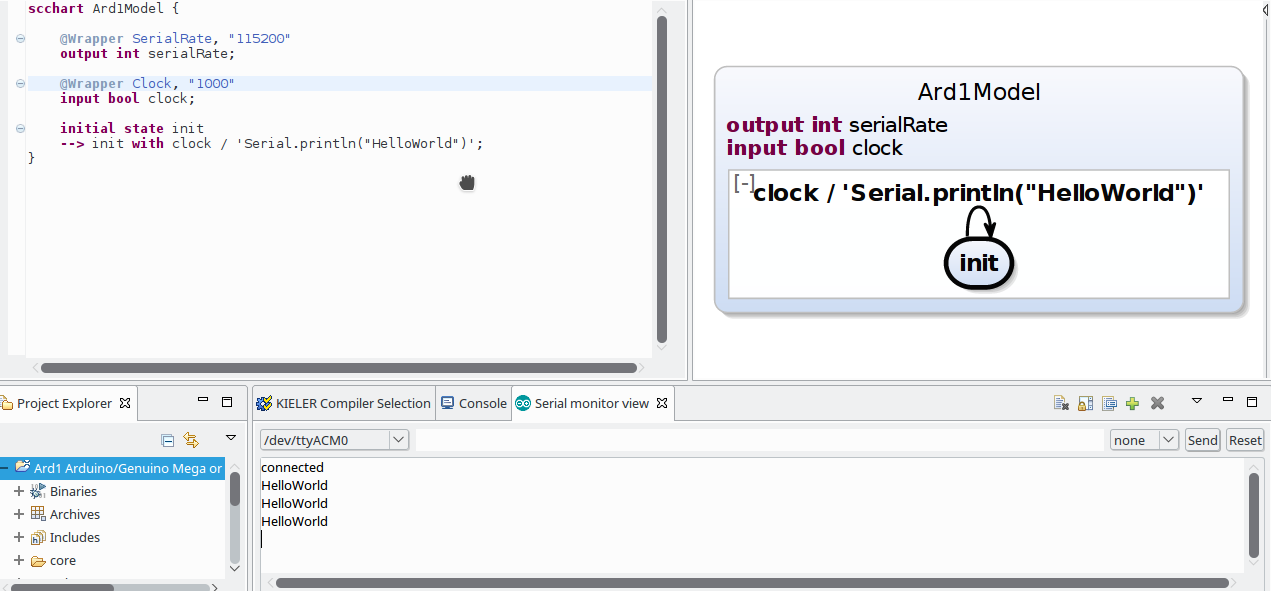
SerialRate, baud | Sets the baud rate for communication. This is done only in the initilization, not in the loop. | output | unsigned | print.ftl | |
Prints a string variable if the string is not 0. | output | string | print.ftl | ||
DigitalWrite, pin | Sets the pin value to HIGH if the variable is true and to LOW otherwise. | output | bool | read_and_write.ftl | |
DigitalRead, pin | Sets the variable value to the pin state (HIGH or LOW). | input | bool | read_and_write.ftl | |
AnalogWrite, pin | Sets the voltage of the given analog IO pin via pulse-width modulation (PWM). Integers from 0 to 1023 are linearly mapped to an pseudo voltage from 0V to 5V. | output | int | read_and_write.ftl | |
AnalogRead, pin | Reads the value of the given analog IO pin. Voltage from 0V to 5V is linearly mapped to an integer value from 0 to 1023. | input | int | read_and_write.ftl |
Using the Serial Monitor
The Arduino Eclipse Plugin has a Serial Monitor (Window > Show View > Other > Arduino > Serial monitor view). Here you can open connections to serial ports and read and write to them.
To open a connection, click the plus button and select the serial port you want to conenct to as well as the serial rate that is used to transmit data. Click OK.
The output of all open connections will be combined in the text editor.
Problem Solving
The following presents typical issues and how to solve them.
Issue | Typical Error Messages | Description | Solution |
|---|---|---|---|
The upload protocol is not set | avrdude: Error: Could not find USBtiny device (0x1781/0xc9f) | You launch a project and there is no different behaviour on your Arduino device, although there are changes in code. You try to launch the project and compilation finishes successful. However The upload fails because the upload protocol is not correctly configured. | Go to the project properties and select Default in the field Upload Protocol (Right click on project > Properties > Arduino > Arduino Board Selection) |
The sim folder is not excluded from the CDT build | Problem markers on files inside the folder kieler-gen/sim | The CDT tries to compile the simulation of models as part of a build, which causes problems. | Select the sim folder and do Right Click > Resource Configurations > Exclude From Build |